ImageTool, a Grails plugin. I prefer to convert this to Java instead of writing my own library. Here is the original & resulting thumbnail using the library.
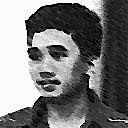
Original Image :  | ||
Default Thumbnail :  | High Quality Thumbnail :  | Square Thumbnail :  |
Above example show bad & good quality of the thumbnail, you should notice the difference.
Basically, Groovy run on top of JVM and Groovy also understand Java syntax. So, it is not difficult to convert this to Java. Please note that this require JAI library to be installed (or included). Here is the converted source code.
import java.awt.RenderingHints; import java.io.*; import java.util.HashMap; import java.util.Map; import java.awt.image.renderable.*; import javax.media.jai.*; import com.sun.media.jai.codec.*; /** *A java version of thumbnail generator http://www.grails.org/plugin/image-tools.
* * @author sverdianto * @see http://www.grails.org/plugin/image-tools * @version 1.0.4 * */ class ImageTool { static Map masks = new HashMap(); static Map alphas = new HashMap(); private RenderedOp original = null; private RenderedOp image = null; private RenderedOp result = null; private RenderedOp alpha = null; private RenderedOp mask = null; /** * Removes the accelaration lib exception */ static { System.setProperty("com.sun.media.jai.disableMediaLib", "true"); } /** * Should a thumbnail be created only if it will be smaller in size than the * current image? */ boolean decreaseOnly = true; /** * Returns the height for the currently loaded image * * @return height of the currently loaded image */ public int getHeight() { return image.getHeight(); } /** * Returns the width for the currently loaded image * * @return width of the currently loaded image */ public int getWidth() { return image.getWidth(); } /** * Saves a snapshot of the currently loaded image * */ public void saveOriginal() { original = (RenderedOp) image.createSnapshot(); } /** * Restores a snapshot onto the original image. * */ public void restoreOriginal() { image = (RenderedOp) original.createSnapshot(); } /** * Loads an image from a file. * * @param file * path to the file from which the image should be loaded * @throws IOException */ public void load(String file) throws IOException { FileSeekableStream fss = new FileSeekableStream(file); image = JAI.create("stream", fss); } /** * Loads a mask from a file and saves it on the cache, indexed by the file * name * * @throws IOException */ public void loadMask(String file) throws IOException { mask = (RenderedOp) ImageTool.masks.get(file); if (mask == null) { FileSeekableStream fss = new FileSeekableStream(file); mask = JAI.create("stream", fss); masks.put(file, mask); } } /** * Loads an alpha mask from a file and saves it on the cache * * @throws IOException */ public void loadAlpha(String file) throws IOException { alpha = (RenderedOp) ImageTool.alphas.get(file); if (alpha == null) { FileSeekableStream fss = new FileSeekableStream(file); alpha = JAI.create("stream", fss); alphas.put(file, alpha); } } /** * Overwrites the current image with the latest result image obtained. */ public void swapSource() { image = result; result = null; } /** * Loads an image from a byte array. * * @param bytes * array to be used for image initialization * @throws IOException */ public void load(byte[] bytes) throws IOException { ByteArraySeekableStream byteStream = new ByteArraySeekableStream(bytes); image = JAI.create("stream", byteStream); } /** * Writes the resulting image to a file. * * @param file * full path where the image should be saved * @param type * file type for the image * @see Possible * JAI encodings */ public void writeResult(String file, String type) throws IOException { FileOutputStream os = new FileOutputStream(file); JAI.create("encode", result, os, type, null); os.close(); } /** * Returns the resulting image as a byte array. * * @param type * file type for the image * @see Possible * JAI encodings */ public byte[] getBytes(String type) throws IOException { ByteArrayOutputStream bos = new ByteArrayOutputStream(); JAI.create("encode", result, bos, type, null); return bos.toByteArray(); } /** * Creates a thumbnail of a maximum length and stores it in the result image * * @param edgeLength * Maximum length */ public void thumbnail(float edgeLength) { if (getHeight() < edgeLength && getWidth() < edgeLength && decreaseOnly) { result = image; } else { boolean tall = (getHeight() > getWidth()); float modifier = edgeLength / (float) (tall ? getHeight() : getWidth()); ParameterBlock params = new ParameterBlock(); params.addSource(image); params.add(modifier);// x scale factor params.add(modifier);// y scale factor params.add(0.0F);// x translate params.add(0.0F);// y translate params.add(new InterpolationNearest());// interpolation method result = JAI.create("scale", params); } } /** * This method creates a thumbnail of the maxWidth and maxHeight it takes as * a parameter * * Example : Calling the method thumnailSpecial(640, 480, 1, 1) will never * produce images larger than 640 on the width, and never larger than 480 on * the height and use InterpolationBilinear(8) and scale * * @param maxWidth * The maximum width the thumbnail is allowed to have * * @param maxHeigth * The maximum height the thumbnail is allowed to have * * @param interPolationType * Is for you to choose what interpolation you wish to use 1 : * InterpolationBilinear(8) // Produces good image quality with * smaller image size(byte) then the other two 2 : * InterpolationBicubic(8) // Supposed to produce better than * above, but also larger size(byte) 3 : InterpolationBicubic2(8) * // Supposed to produce the best of the three, but also largest * size(byte) * * @param renderingType * Too choose the rendering type 1: Uses scale // Better on * larger thumbnails 2: Uses SubsampleAverage // Produces clearer * images when it comes to really small thumbnail e.g 80x60 */ public void thumbnailSpecial(float maxWidth, float maxHeight, int interPolationType, int renderingType) { if (getHeight() <= maxHeight && getWidth() <= maxWidth) { /** * Don't change, keep it as it is, even though one might loose out * on the compression included below (not sure) */ result = image; } else { boolean tall = (getHeight() * (maxWidth / maxHeight) > getWidth()); float modifier = maxWidth / (float) (tall ? (getHeight() * (maxWidth / maxHeight)) : getWidth()); ParameterBlock params = new ParameterBlock(); params.addSource(image); /** * Had to do this because of that the different rendering options * require either float or double */ switch (renderingType) { case 1: params.add(modifier);// x scale factor params.add(modifier);// y scale factor break; case 2: params.add((double) modifier);// x scale factor params.add((double) modifier);// y scale factor break; default: params.add(modifier);// x scale factor params.add(modifier);// y scale factor break; } params.add(0.0F);// x translate params.add(0.0F);// y translate switch (interPolationType) { case 1: params.add(new InterpolationBilinear(8)); break; // Produces good image quality with smaller image // size(byte) then the other two case 2: params.add(new InterpolationBicubic(8)); break; // Supposed to produce better than above, but also larger // size(byte) case 3: params.add(new InterpolationBicubic2(8)); break; // Supposed to produce the best of the two, but also // largest size(byte) default: params.add(new InterpolationBilinear(8)); break; } switch (renderingType) { case 1: result = JAI.create("scale", params); break; case 2: RenderingHints qualityHints = new RenderingHints( RenderingHints.KEY_RENDERING, RenderingHints.VALUE_RENDER_QUALITY); result = JAI.create("SubsampleAverage", params, qualityHints); break; default: result = JAI.create("scale", params); break; } } } public void setImageToNull() { image = null; } /** * Crops the image and stores the result * * @param edgeX * Horizontal crop. The image will be cropped edgeX/2 on both * sides. * @param edgeY * Vertical crop. The image will be cropped edgeY/2 on top and * bottom. */ public void crop(float edgeX, float edgeY) { ParameterBlock params = new ParameterBlock(); params.addSource(image); params.add((float) (edgeX / 2));// x origin params.add((float) (edgeY / 2));// y origin params.add((float) (getWidth() - edgeX));// width params.add((float) (getHeight() - edgeY));// height result = JAI.create("crop", params); } /** * Crops the image to a square, centered, and stores it in the result image * */ public void square() { float border = getWidth() - getHeight(); float cropX, cropY; if (border > 0) { cropX = border; cropY = 0; } else { cropX = 0; cropY = -border; } crop(cropX, cropY); } /** * Applies the currently loaded mask and alpha to the image */ public void applyMask() { ParameterBlock params = new ParameterBlock(); params.addSource(mask); params.addSource(image); params.add(alpha); params.add(null); params.add(new Boolean(false)); result = JAI.create("composite", params, null); } }
Here is the example how to use it.
import java.io.IOException;

public class Main {
    public static void main(String[] args) throws IOException {
        ImageTool imageTool = new ImageTool();
        imageTool.load("/home/sverdianto/Pictures/tiger.jpg");
        imageTool.thumbnail(100);
        imageTool.writeResult("/home/sverdianto/Pictures/a.png", "PNG");

        ImageTool imageTool2 = new ImageTool();
        imageTool2.load("/home/sverdianto/Pictures/tiger.jpg");
        imageTool2.thumbnailSpecial(100, 100, 3, 2); // see the thumbnailSpecial JavaDoc
        imageTool2.writeResult("/home/sverdianto/Pictures/b.png", "PNG");

        ImageTool imageTool3 = new ImageTool();
        imageTool3.load("/home/sverdianto/Pictures/tiger.jpg");
        imageTool3.thumbnailSpecial(100, 100, 3, 2);
        imageTool3.swapSource();
        imageTool3.square(); // square the thumbnail
        imageTool3.writeResult("/home/sverdianto/Pictures/c.png", "PNG");
    }
}